AION 2 Assassin Field Manual
Skill levels, trait choices, Stigma timing, gear, Genus, Arcana, rear-position uptime, and current endgame priorities.
Official patch changes, community recommendations, and player testing are labeled separately. The Global version may receive the same class balance without launching with every KR/TW progression system.
Quick PvE build
Use this section for a fast setup. The later sections explain when and why to change it.
Stable boss DPS
Recommended for most boss fights. It keeps your major cooldowns together, gives you room for defensive play, and performs well without requiring a perfect run.


Prioritize consistency while learning. Keep Heart Gore's life-steal trait and Insignia Explosion at level 20. Dropping Insignia Explosion to 16 for additional passive levels is an endgame optimization, not a starting build.
Skill levels and trait breakpoints
The recommended build takes four core skills to level 20, then spends the remaining points on stagger damage, recovery, and movement.
| Skill | Target | Traits | Use | Why it earns points |
|---|---|---|---|---|
| Quick Slice | 20 | 3 · 4 · 5 | Core | Your main repeatable attack and one of the four skills recommended at level 20. |
| Heart Gore | 20 | 4 · 5 | Core | High-priority strike. Keep the life-steal option for progression and unfamiliar fights. |
| Insignia ExplosionRune Burst | 20 / 16 | 2 · 5 | Core | Level 20 is the safe default. Stop at 16 only when the four saved points complete more valuable passive-skill levels. |
| Savage Roar | 20 / 12 | 2 · 3 · 4 | Core | Level 20 is the high-end target; 12 is a reasonable stop when its share of your damage is low. |
| Storm Rampage | 16 | 1 · 4 | Stagger | Use it during a boss stagger when your main burst is unavailable. Do not press it automatically on every stagger. |
| Shadow Fall | 12+ | 1 · 3 | Recovery | Provides immediate healing and a short reposition, making it especially useful while soloing or learning a fight. |
| Whirlwind Slice | 12 / 16 | By content | Flex | Choose stationary damage, mobility, or area coverage. Avoid the movement version near lethal edges. |
| Flash Slice | 8+ | 2 · 4 | Position | Recommended fixed positioning traits in the July 15 guide. |
| Infiltrate | 8+ | Range / recovery | Utility | Use it to reach the boss's rear and maintain your resource flow. The damage option is worse if it creates downtime afterward. |
| Defiance | 12 / 16 | 2 · 3 / 3 · 5 | Utility | Trait pair depends on breakpoint. Its cooldown can no longer be reduced after July 29. |


ENDGAME OPTIONWhen should Insignia Explosion stop at level 16?
Only make this change when you no longer need the extra consistency from level 20 and the four saved points complete important passive levels. SoundFox's high-end example reaches approximately Rear Smite 36, Assault Stance 34, Exploit Weakness 29, and Impact Hit 25 with strong Arcana rolls.
Treat those numbers as an endgame target, not a requirement.
Passive order

Invest here first because Assassin already wants to attack from behind whenever possible.

A major offensive passive for your fully committed burst windows.

The referenced test gives it +0.5% Attack per level, making it a stronger early investment than Impact Hit.

A strong investment after the three higher-priority passives.

Add recovery when the encounter requires it, then continue investing in damage.
Stigma priority and cooldown timing
After the July 8 update, rear critical hits reduce Illusive Clone's cooldown. Your Stigmas should now be planned as one coordinated burst cycle.
Illusive Clone25 first
After the July 8 update, specialization #5 reduces its cooldown whenever you land a rear critical hit. This makes it the first Stigma to take to level 25.
Swift Contract25
Use it with Illusive Clone. Once your cooldown reduction is high enough, both buffs should be ready for the same burst window.
Triniel’s Dagger25
This is more than a damage skill. Its cooldown effect and rear-damage window help keep your major buffs synchronized.
Claw of the Beast20 → 25
A core offensive buff. Upgrade it after the first three Stigmas unless its next trait unlock gives better immediate value.
Evasion StanceDefense
The safer optional choice for progression, difficult mechanics, and maintaining uptime through incoming damage.

Throw ShadowbladeDamage / range
Use it for ranged contact, field content, or encounters where Evasion Stance is not needed.
Deal damage and trigger its cooldown effect
Bring Illusive Clone back sooner
Tested estimate These values come from SoundFox's cooldown calculation, not an official game formula. Your results will change with Combat Speed, rear uptime, missed attacks, latency, and boss mechanics.
Use Triniel's Dagger normally when your cooldowns are far apart. Hold it for roughly 3–8 seconds only when doing so lines it up with the next Illusive Clone window without costing you an entire cast.
Use priorities instead of one fixed rotation
Boss movement and mechanics will interrupt any exact sequence. Follow these priorities so the rotation still works in a real fight.
- 01Establish the rear before committing.
Enter with Ambush, Shadowstrike, or Infiltrate, but keep one tool available for the boss’s forced movement.
- 02Use your four core attacks during the full buff window.
Prioritize Quick Slice, Heart Gore, Insignia Explosion, and Savage Roar while Illusive Clone, Swift Contract, and Savage Fang are active.
- 03Use Storm Rampage when stagger occurs between burst cycles.
If the boss is staggered while Illusive Clone is unavailable, use Storm Rampage until your main burst returns. Do not press it automatically on every stagger.
- 04Use defensive skills when they prevent downtime.
Shadow Fall's recovery and Evasion Stance can keep you attacking. Preventing a death or disengage is worth more than one extra offensive skill.
- 05Delay a cooldown only when it improves the next burst.
Do not hold Triniel's Dagger indefinitely. A short delay is reasonable before boss invulnerability, forced movement, or an upcoming Illusive Clone window.
INPUT SETUPWhat “macro” means in the referenced videos
The videos combine repeated normal attacks with AION 2's built-in macro slots and skill queue. The exact delay depends on the player's Combat Speed, latency, and hardware.
- Use the built-in game macro as the safe starting point.
- Keep Savage Roar on its own manual key even at low ping. Do not place it in the repeating skill line.
- Keep buffs, movement skills, defensive reactions, and conditional uses of Insignia Explosion on manual keys.
- Retest whenever your Combat Speed or cooldown reduction changes. SoundFox uses roughly 1,300–1,400 registered hits in the training test as a consistency check—not a guaranteed DPS target.
- Follow the current game rules and do not assume external automation is permitted.
Why is my DPS low?
Test one change at a time. A controlled training-room comparison is more useful than replacing several items and guessing which one helped.
Use the same duration, target, rear position, consumables, party-buff state, and opener. Record misses, rear uptime, normal-attack count, Clone/Swift separation, Dagger casts, and deaths or forced disengages.
Endgame PvE gear and soul binds
Each equipment slot has one or two effects that define its value. Secure those first, then use Attack, skill levels, and other offensive stats to complete the item.

Current AION 2 Assassin database item art
Combat Speed, Might, Weapon Damage Boost, Damage Boost, and Attack matter more than a larger Combat Power number by itself.
Secure the recommended special stat, then look for Rear Smite, Assault Stance, Impact Hit, and Exploit Weakness.
Do not reroll a useful active or passive skill level simply because another item displays more Combat Power.
| Slot | Priority effect | Other strong stats | Skill and optional rolls |
|---|---|---|---|
| Main + off-hand | Combat Speed | Might > Weapon Damage Boost > Damage Boost | Multi-hit / Precision > Attack > Critical |
| Helmet | Smite + Attack Increase | Attack | Rear Smite = Assault Stance > Impact Hit > Exploit Weakness |
| Pauldrons | Critical Damage Boost | Attack | Rear Smite = Assault Stance > Impact Hit > Exploit Weakness |
| Chest | Damage Boost | Attack | Rear Smite = Assault Stance > Impact Hit > Exploit Weakness |
| Pants | Damage Tolerance + Attack Increase | Attack | Rear Smite = Assault Stance > Impact Hit > Exploit Weakness |
| Gloves | Combat Speed | Attack | Rear Smite = Assault Stance > Impact Hit > Exploit Weakness |
| Cloak | Smite + Attack Increase | Attack | Rear Smite = Assault Stance > Impact Hit > Exploit Weakness |
| Shoes | Movement Speed | Attack | Rear Smite = Assault Stance > Impact Hit > Exploit Weakness |
| Necklace + earrings | Attack | Critical after the hit check | Rear Smite = Assault Stance > Impact Hit > Exploit Weakness > Determination > Defense Break |
| Rings | Active skill breakpoint | Heart Gore > Insignia Explosion > Quick Slice > Storm Rampage | Attack > Critical after a useful 16/20 breakpoint |
There is no single requirement for every boss. If attacks still miss or are parried, you need more Accuracy.
This is a progression route, not the late-game destination or an official cap. Replace excess sheet stats once your buffed build passes both checks.
English names translated from Korean, Taiwanese, or Chinese sources may differ from the live client.
Manastone priority
With dependable rear uptime and stable Critical Hit, use Back Attack Damage Boost > Weapon Damage Boost > Critical Damage Boost > Attack +25 > regular Damage Boost as the comparison baseline. Attack +30 or better can move up, but it must be calculated against your current stats. If the encounter ruins rear uptime, recalculate rather than forcing Back Attack Boost into first place.
Where to get more Smite and Back Attack Boost
You can also gain Smite from Genus slots 3/9, the Smite passive and its skill-level bonuses, Pantheon, artwork, offensive titles, wings, and bracelet soul binds.
Then consider soul binds and collection bonuses after checking their live tooltips. Remember that the stat only applies when the attack is recognized as a rear hit.
Titles, wings, artwork, and seasonal rewards can change. Confirm where an item currently comes from before paying for rerolls or upgrades.
Genus, Daevanion, Arcana, and account bonuses
Complete important skill breakpoints before chasing Combat Power. A larger profile number does not always produce more damage.
Stat decision order
Pet / Genus: progression board
| Slots | First lock | Second choice | Fallback |
|---|---|---|---|
| 1 / 4 / 7 | Critical Hit until your target is met | Accuracy once Critical Hit is covered | Boss Attack 18+ only when both checks are already met |
| 2 / 5 / 8 | Additional Attack 12+ | Maximum Attack 19/20 | Boss Attack |
| 6 | Damage Tolerance or PvE Damage Tolerance | Near-max roll | Boss Attack |
| 3 / 9 | Smite 2%+ | Back Attack Damage Boost 2.8%+ | Aim for 5/5 after the board works |
Starter route Use this board while misses, inconsistent Critical Hits, and incomplete rolls are still limiting the build. A near-maximum Additional Attack roll is roughly 14–15 out of 16. Do not mistake the ~2,200 Critical Hit routing target for a permanent endgame cap.
Pet / Genus: late-game min-max board
| Slots | Min-max target | Condition | Decision rule |
|---|---|---|---|
| 1 / 4 / 7 | Boss Attack 18+ | Keep only the Critical Hit / Accuracy your buffed build needs | Do not pay for sheet-stat overflow |
| 2 / 5 / 8 | Additional Attack 12+ | Maximum Attack 19/20 | Replace low rolls before chasing perfection elsewhere |
| 3 / 9 | Smite 2%+ | Back Attack Damage Boost 2.8%+ with reliable rear uptime | Use the damage calculator for close rolls |
| 6 | PvE Damage Tolerance | Near-max encounter-appropriate roll | Survival that preserves uptime beats a dead parse |
Late-game route Check the character with raid buffs active. Once Accuracy and Critical Hit are sufficient for the target, slots 1/4/7 can move into Boss Attack 18+ rather than continuing to stack sheet stats. Slots 3/9 remain a Smite-versus-Back-Attack decision based on the encounter and your measured rear uptime.
Smite or Back Attack Damage Boost?
- Smite: more consistent on bosses that move often or frequently turn away from the tank.
- Back Attack Damage Boost: stronger when you can remain behind the boss for most of the fight.
- Do not lock weak rolls too early: establish strong offensive rows before spending heavily on perfect Critical Hit or Accuracy rolls.
- After meeting both checks: move additional rolls into Boss Attack, PvE Attack, or flat Attack.
Prioritize skill breakpoints over tile rarity
- Orange → Blue → Green → White is a useful default priority.
- Ignore that order when a lower-rarity tile immediately completes a level 12, 16, or 20 skill breakpoint.
- For normal PvE nodes, prioritize Attack → Critical Hit / Accuracy → HP → Defense.
- Complete early boards over time, but never delay a core trait simply to finish every tile.
Arcana target map
This is the main active-skill piece. Aim for a useful 4/2 or 3/3/2 distribution instead of copying one perfect endgame roll.
Storm Rampage +2 and Defiance +2 are practical flex rolls; an older Surprise Attack roll is no longer mandatory.
Rear Smite, Assault Stance, and Exploit Weakness are often why two Assassins with similar Combat Power deal different damage.
Key favors Weapon Damage, Back Attack Damage, and Critical Damage. Hourglass is acceptable with useful PvE resistance and does not need perfect rolls immediately.
Complete active skills first
Heart Gore 20 > Insignia Explosion 20 > Quick Slice 20 > Savage Roar 20 > Storm Rampage 16 > Ambush 16.
The ideal skill pool includes Heart Gore, Quick Slice, Insignia Explosion, Ambush, Rear Smite, Assault Stance, Impact Hit, and Exploit Weakness. Complete the important active-skill breakpoints before optimizing passive rolls.
Pantheon, artwork, and statues
Colossus: Kasiniel, followed by Zikel or Kromede. Statues: prioritize Death effects. Artwork: Illusion + Wisdom.
These are community endgame recommendations, not universal best-in-slot choices. Compare the live tooltip with the stats your regular party already provides.
Titles and wings shortlist
| Use | First target | Alternatives | Note |
|---|---|---|---|
| Offense title | Unbound by Genus / 4% Smite title | Guardian of Verteron / Altgard | Use the exact live effect; translations and faction names differ. |
| Defense title | Season Winner | Rule Everything; Saint of Verteron / Altgard | Swap only when survival restores real uptime. |
| Utility title | Empty Closet | Heir of Wise Dragon; Through Hell and Back | Utility is encounter-specific. |
| Wings | Talisra Wings | Dragmata / Ego / Forest Spirit Wings | Verify current acquisition and compare speed/CDR against party buffs. |
First target: 83% Combat Speed and 32% cooldown reduction while using a Combat Speed Scroll. With a level-20 Chanter Power of the Storm: 88% Combat Speed and 56% cooldown reduction. These are tested rotation targets, not official minimum requirements or hard caps. Confirm them on the training dummy because latency and animation timing can change the result.
Global launch versus current KR/TW
Global may begin with fewer Stigma and Arcana slots even if its class balance resembles the current Taiwan patch.
The present endgame recommendations assume systems that may unlock later on Global.
Invest in the same core skills, then adapt the build to the number of slots available on your server.
Progression from leveling to endgame
Follow the main story and orange objectives. Use area quests and sealed dungeons when a boss walls progression; avoid over-farming a temporary weapon.
Collect Lord-trace/feather skill points, farm Daevanion points from sealed content and garrisons, expand the pet codex, and use rifts for account power.
Reach the important level 16 and 20 trait breakpoints first. Then invest in Rear Smite, Assault Stance, and Exploit Weakness instead of spreading points evenly.
Wanted orders, Abyss supply accessories, expedition gear, Transcendence Arcana, enhancement materials, engraving boxes, and breakthrough stones.
Current public profiles average roughly 2,297 Attack, 1,140 Critical Hit, 541 Accuracy, 457 Back Attack Boost, 245 Weapon Damage Boost, and 213 Damage Boost. These describe the population; they are not entry requirements.
Consumables and party setup
Evaluate your stats with the buffs you actually use in a raid. Checking only the unbuffed character sheet can lead to wasted Critical Hit, Accuracy, or Combat Speed.
Use food to cover any missing Accuracy or Critical Hit, then favor Attack. Use an affordable recovery drink and the Combat Speed Scroll assumed by your chosen breakpoint.
Defense, Damage Tolerance, or recovery can increase your real DPS when it prevents a death, disengage, or lost rear-position window.
Use expensive short-duration buffs for kill attempts or controlled damage comparisons. The standard build should not depend on them.
Power of the Storm can bring the build to the tested 88% Combat Speed / 56% cooldown-reduction target. Do not gear around this buff if your usual party does not always include it.
Reliable aggro and predictable facing improve rear uptime. Coordinate boss turns and pulls instead of spending every movement skill fixing your position.
Reliable healing may allow one more offensive option, but removing every defensive skill can still reduce DPS through deaths and forced disengagement.
With all party buffs active, check for missed attacks, Critical Hit consistency, Combat Speed, cooldown reduction, and rear uptime. Only move excess stats into Attack, skill levels, Smite, or Back Attack Damage Boost after those checks pass.
Macro and keybind example
The reference image shows both AION 2's built-in skill macro and separate key-repeat software. These are different tools and should not be treated as interchangeable.
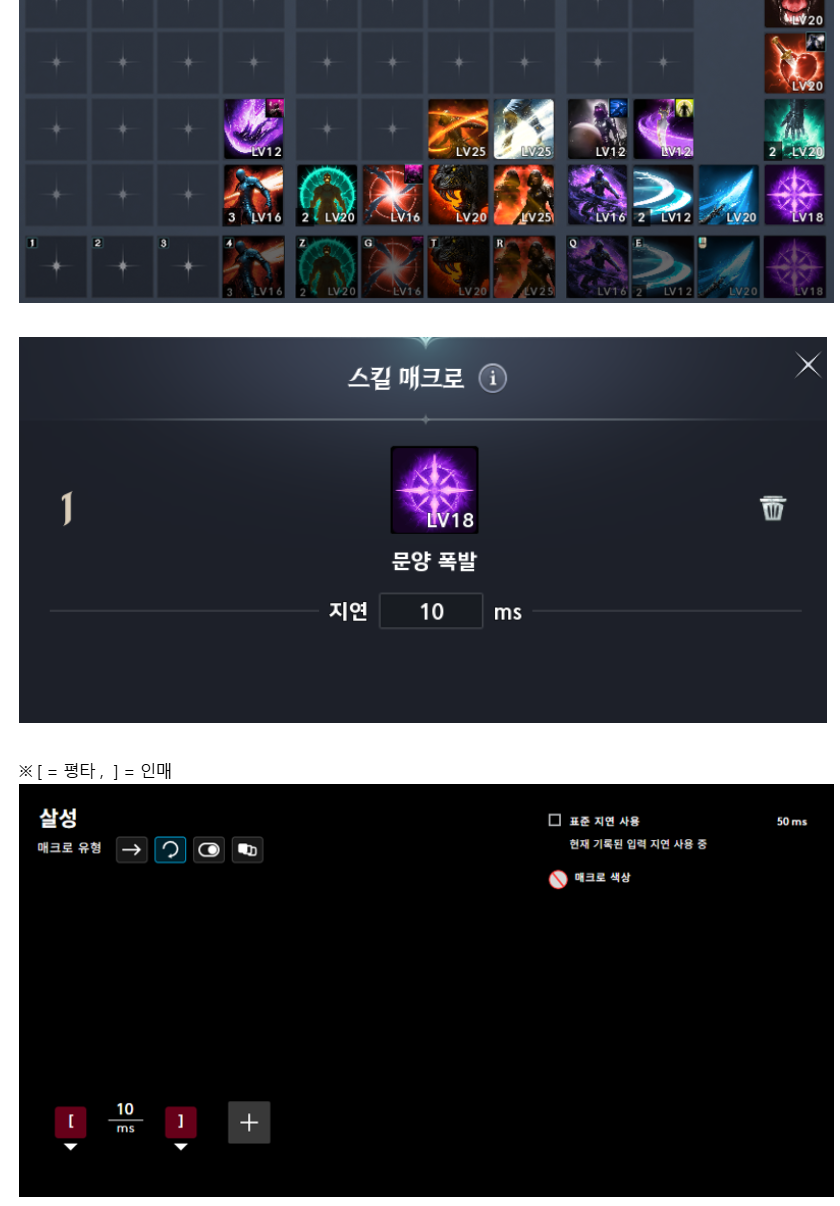
Place the built-in skill macro next to normal attack. Do not add Savage Roar merely because your ping is low; extra animation and priority conflicts can reduce the consistency of the loop.
Give Savage Roar its own key and press it deliberately during a safe damage window. Also keep Illusive Clone, Swift Contract, Triniel's Dagger, movement, defense, Storm Rampage, and conditional Insignia Explosion uses under direct control.
Combat Speed, latency, and animation timing affect normal-attack loss. Compare equal-duration hit counts, use the built-in macro, and do not assume external automation is permitted.
How diminishing returns actually work
AION 2 does not appear to apply a hidden penalty at a specific threshold. Instead, adding more percentage points to an already large additive category gives a smaller relative improvement.
Compare your actual build before replacing a roll
Enter both setups with the same buffs and rear-uptime assumption. Use the result to compare Attack +25 or +30 against Back Attack, Weapon, Critical, and regular Damage Boost instead of relying on one fixed list.
Setup A deals about 1.72% more damage than B or C while attacking from the rear. B and C are equal against a boss because Boss Damage and general Damage Boost are added together before the rear-damage multiplier is applied.
How to compare two stats
Add each proposed roll to the category it belongs to, multiply the separate categories, and account for your real rear uptime. The larger tooltip percentage is not necessarily the larger final increase.
How to test it
Run equal-duration tests and change only one stat at a time. Record misses, rear uptime, total hit count, Critical Hit behavior, and buff timing instead of comparing only your best attempt.
Inven damage tests Skill-damage experiments found that equal amounts of Boss Damage, general Damage Boost, and PvE Damage Boost produced the same increase against a boss. Back Attack Damage Boost was measured as a separate multiplier. Multi-hit is less certain, so the guide does not assign it one exact universal value.
Relevant patch history
The site baseline is 12 August. Later discoveries can change recommendations even when the latest patch has no Assassin-specific line.
Previous baseline
No direct Assassin buff or nerf. Defiance stopped receiving cooldown reduction. Character Switch, network display, pet auto-loot, and better tooltip wrapping arrived.
Defense pass
Evasion Stance specialization #3 became +20% movement speed for 3 seconds after a successful block. Life-steal effects became single-target.
Illusive Clone update
Specialization #5 now removes 1 second of Illusive Clone cooldown on a rear critical. Throw Shadowblade no longer costs Mana; Shadow Walk bugs were fixed.
Chapter 1
Level cap 50, level-25 Stigmas, Pendant progression, and expanded Arcana systems.
Videos and supporting research
Recommendations were checked against subtitles, on-screen build summaries, or locally transcribed sections. Use the chapter links to review each source in context.
Also checked: NCSoft's Chapter 1 overview, translated patch notes from July 8, 22, and 29, current Assassin skill data, public profile averages, and the attached Ranger and Sorcerer guides for structure and presentation.
Build comparison: AION 2 DPS / Damage Calculator. Use identical encounter and buff assumptions when comparing two setups.
Skill and dagger icons come from current game data provided by AION2 Hub. Community recommendations and player tests are labeled separately from official patch information.